Archive

Monthly Archives: December 2015

Today, we’re going to learn how to setup Blender to render a full-immersion 3D video and upload it to YouTube. We’ll start by covering some gear to preview your videos (with links to Amazon), quickly fabricate a scene, configure Blender for 3D output, do the required prep, and finally upload to YouTube. Nothing we do here is particularly novel or difficult, but it will hopefully save you some time in making videos of your own.

Here’s a preview of the finished product. Open in the YouTube app to view as a Cardboard video.

Direct link:
https://www.youtube.com/watch?v=4QP9vHB7-Rw

Embed:

And the .blend file:

https://drive.google.com/file/d/0BxkijDBoaFrmd2Rua0k1NnZIeGc/view?usp=sharing


Motivation


I played with Google Cardboard at home this winter. The setup and use stood in stark relief to the setup and use of my Oculus at home. Connecting the camera of the Oculus, the HDMI out, the power, installing drivers, updating the device, all took on the order of hours. In contrast, the Cardboard took on the order of 15 minutes to assemble, and the Cardboard App downloaded in parallel. It’s not a replacement for the Oculus, but as a function of dollars+effort in to entertainment value out, it’s quite effective.


Gear


Pretty much any Google Cardboard kit will do fine. I picked up this because I wanted something I could use without my glasses. It supports focal and IPD adjustments:

If you’re on the market for something cheaper and Prime ready, this is also an option:

Again, any cardboard device will do. Here is a lengthy Amazon list of cheap devices.


Setting Scene and View


Open the scene you want to use for 3D video. Reset the orientation and position of your camera, then set the camera’s rotation so that it is pointing straight down the positive Y-axis. If you’d like to use a pre-made scene, download the .blend file above.


Render settings


Be sure you’re using the Cycle’s renderer. Blender’s default rendering engine doesn’t have the camera settings we need to correctly export a video.

01_cycles

Next, open up the “Render Layers” section on the right side and check “Views” at the bottom.

02 Scene Settings

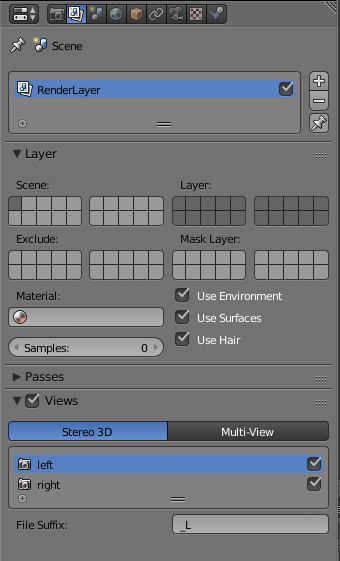
By default, Stereo 3D provides left and right views. We’re done with this pane.


Camera Settings


Make your way over to camera settings. We will switch the camera type from Perspective to Panoramic. This allows us to capture the scene in its entirety in a single render pass. In the “Type” option below Lens type, switch to “Equirectangular.” Google’s tools expect equirectangular output.

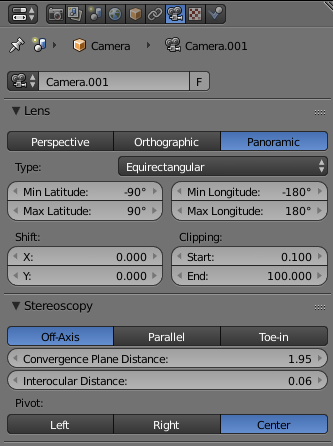
Convergence Plane Distance and Interocular distance can remain the same.

Set the pivot to whatever you’d like. I prefer ‘center’.

Your camera tab should look like this:

03 Camera Settings


Output settings


Update the following settings:

Device: GPU Compute! Don’t forget this! You _can_ use your CPU to run Cycles, but it’s going to take a lot longer.

Output: MPEG (Needed for Google’s Metadata tool.)

Views Format: Stereo 3D

Stereo Mode: Top-Bottom (or left-right, but I like top-bottom because it’s easier to view the video before upload.)

Encoding:

Format: MP4 (Needed by YouTube’s tool.)

Codec: H.264

Audio Codec: AAC

Then set your start frame/end frame and resolution. Mash render. You settings should look like this:

04 Render Settings


YouTube Prep


Download the YouTube 360-Degree Video Tool here: https://support.google.com/youtube/answer/6178631?hl=en

Unzip it and fire it up.

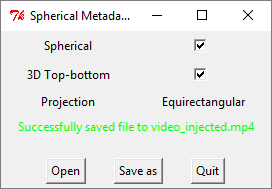
Open the video you just created. Check ‘spherical’ and ‘3D Top-bottom’.

‘Save as’ and place your newly created file wherever you’d like.

05 Spherical Metadata


YouTube Upload


Upload the newly created video to YouTube as you would any other.

When completed, go to ‘Info and Settings’ on the video page.

06 Info and Settings

Select the ‘Advanced Options’ tab and check “This Video is 3D.” Select the Top-Bottom option and save your changes.

07 Advanced


That’s it! Now you should be able to view your 3D video in browser or in Cardboard on your device.

Had some time to myself this morning after a few days without internet access. Got TMX maps loading and drawing, and fixed a bug with collision. For the curious, setOrigin(float, float) does NOT accept a value from [0, 1] which determines the centerpoint. It takes a value IN PIXELS. Also, getX() and getY() do not subtract out the origin, so you’ve got to do that yourself when calling draw().

libGDX Jam - Collisions with Map

Wrapping up the end of the first day. There’s a chance I’ll do more tonight, but I’ve got to pack for my trip. Progress was faster than expected. I have characters on the screen and movement.

One hiccup I had today was unprojecting the from a screen click to a point in physics space. I was doing camera.unproject(blah blah) and couldn’t figure out why my Y-coordinate was flipped when I had correctly set my view. It seemed that whether or not I set y-down in my orthographic camera, as I clicked closer to the bottom of the frame, the larger the number got! It turns out if you’re attaching an InputListener to a STAGE object in libGDX, it will be called with correctly unprojected x and y values based on the current camera, so I was double unwrapping. I figured this out when I made my camera follow the player and had different values coming in while not moving the mouse. Important safety tip.

The fruits of today’s labor:

libGDX_GameJam_2015_D01