Team Dogpit is hosting Cultivation Jam! Full details are available on the itch.io page.
The special hidden theme is ‘Household Goods’.
The idea that keeps sticking in my head is a clone of Stardew Valley or Animal Crossing, but aboard a generation ship. You need to take care of the plants and fix pieces of the ship using only the tools you can scrounge up locally. Your goal is to prepare enough food to feed a set of 100 people for one season.
MVP:
Player can click to move around.
Clicking on nearby plants will give the option to tend to them, which means checking hydroponics levels, looking for signs of rot/blight, taking samples, and pollinating.
Plants have real life stages, seedling, sapling, grown, flowering, dying, dead.
Plants have real life needs, like sun, nutrients, space, temperature.
Part of the challenge might be in balancing time taking care of the plants with time spent exploring the ship’s waste and part recycling in the hopes of finding new and interesting components. Diving deeper into those depths will let you find more stuff but increases risk of getting squished by falling debris or maybe eaten by a sentient dishwasher or something. But that’s too far ahead. For now, let’s get a player walking around.
Day 1-3:
Well the click to move around turned out to be a little dumb. Not only does it require that we figure out pathing (not hard, but tricky to decide on things architecturally), it doesn’t make sense! If someone has to click on something to move to it, why can’t they just click on it!?
I replaced that with a character controller and the normal WASD + controller support.
I started and stopped the inventory a dozen times because every solution felt hacky. I have a single Inventory scene which holds a bunch of items. Each item has an InventoryItem sub-object. When something is in the inventory, the InventoryItem node gets pulled out and the parent (the actual world item) is shoved into the InventoryItem’s world object slot. I had each InventoryItem also inherit from a NinePatchRectangle because I wanted that to be a nice background, but this is a hassle, so I’m making them TextureButtons. Instead, the inventory itself will draw the boxes and will highlight the destination on mouse moves. That’s more sensible as far as I’m concerned.
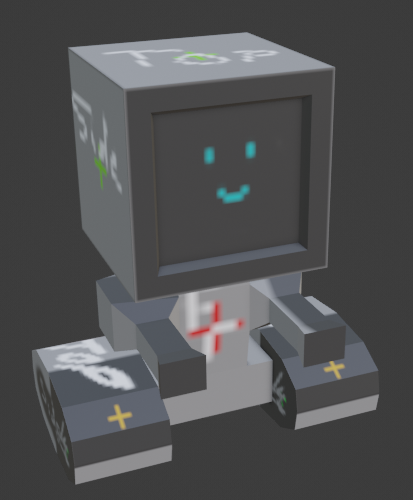
And I made a robot:
Day 4-5:
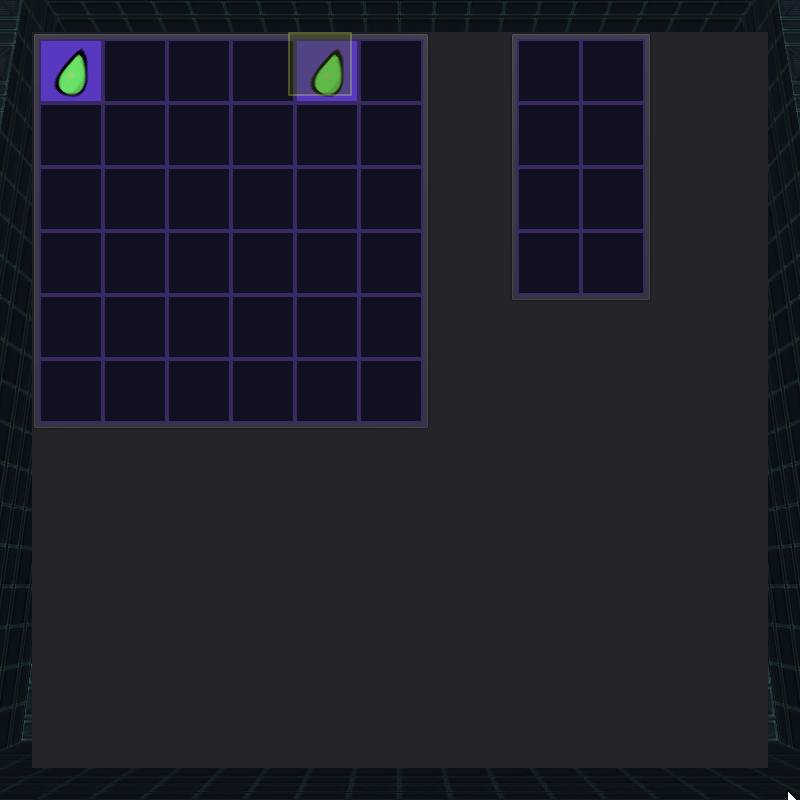
Only had about 30 minutes per night to work on things. Spent most of the time working on the drag and drop and the cross-inventory dragging. There are still some bugs but now one can drag items from one inventory into another inventory. The inventory object emits a signal when the cursor moves out and when it moves back in. It feels messy, but it’s self contained at least and makes proper use of signals.
Left: Player inventory. Right: Some other inventory.
Day 6-8
An evening setback from an unexpected social outing (no regrets), followed by a productive stint of fixing things and changing around how the UI is connected together. My efforts to detach the UI display from the UI contents didn’t pan out because the UI contents still need position info, which means they need to be inside a tree, which means they need to be owned. Instead, I have a UI Exchange interface which takes two inventories and allows a user to click and drag things between them. This turned out to be really nice. I also added a Global which tracks which UI screen is open and prevents the player from moving if they’re looking at an inventory. I started work on saving and loading, since that will be required eventually anyway. While I’d intended to start on the dungeon crawling aspect, that got a little side tracked with stashing and unstashing the different parts of the level.
I started working on PixelBox in 2021 as a way of managing my gamedev assets and memes. In short, there were too many times where I found myself scrounging through the bottomless pile of photos on my hard drive for the perfect response, often forgetting the very thing for which I was searching in the process. A similar issue was one of “have I already downloading this asset from the store”?
To solve both of these issues I started working on PixelBox. It’s a simple tool designed to provide quick search for related images, plus title and, recently, exif search.
This post is mostly a retrospective on the things that went nicely, things that didn’t work out, things that are making me nervous, and places I’d like to take the application.
What Went Well
PixelBox was build with Rust, egui, Tract-ONNX, and PyTorch. I am quite happy with all of these options, as they’ve proven to add very little in the way of head-to-wall percussion and a lot of functionality. In particular, I am very much a fan of egui now that I’ve gotten used to it. The Rust ecosystem doesn’t have very many full-fledged cross-platform gui toolkits. There are several which _claim_ to be cross-platform but will fail to build on Windows or lack some pretty basic functionality. The two that I know of which live up to the hype are FLTK-RS and egui. Neither is really native look-and-feel, but ultimately I decided this was an acceptable trade-off for ease of use and memory-footprint. Building a UI in egui takes some getting used to, and I don’t have quite as much control over the layout as I might want, but Godot this is not, and ultimately I would have made a mess of it given the option.
What Didn’t Go Well
Fearless Concurrency Only Applies to Rust
The longest running and most painful issue by far was an issue with SQLite that would crash the application once every twenty or so searches. To understand why, we need to touch on how the image search works.
When PixelBox indexes an image, it passes the RGB info through a neural network (via ONNX) and gets back a low-dimensional embedding on the unit hypersphere. If that’s too complicated, just imagine two points, x and y, on the surface of a ball. If that’s too simple, just imagine a vector of N digits from -1 to 1 whose squared sums total to one. When we want to search for a similar image, we iterate over our index* and perform cosine_similarity on each image, returning a distance**. Cosine similarity is a user-defined function written in Rust and exposed to the SQLite driver. It’s quite fast, searching over ~100k images in about 100ms on my system. * Yes, technically iterating over a database isn’t best practice, but we’re not here to solve the general ANN problem and this is plenty fast at the scale that we’re running. ** Technically it’s returning a similarity, but we can remap -1 to 1 into a 0 to infinity range.
Once every twenty searches, however, the function would disappear.
How does one _lose_ a function? Excellent question. For a while I thought that perhaps Rust was reclaiming and shuffling around a pointer to the method since I didn’t have anything pinned, but that didn’t make sense. After a lot of avoiding the problem, I found a solution purely by happenstance. Chalk one up for procrastination.
The application was running in the background and indexing my dev directory. I left for a cup of coffee and when I came back to run a search, the application crashed. Eyebrows raised. I started backgrounding the app for longer and longer periods, eventually finding that the application would trigger the exception and fault after about one minute.
It turned out that when I was adding the function definition to SQLite, it was available only to the current connection in the pool. I had gone with a connection pool because I wanted any thread to be able to write to the index — easier to parallel spider the directories. This was the problem.
It took a bit of rewriting. I stripped out the SQLite connection pooling and added a single thread which would read from the inbound image stream and index the images. The issue went away and the application was even faster.
Image Search is Hard
PixelBox was built based on the idea that one could train a network to learn the representation of an image via contrastive learning. We take a bunch of images and randomly match them with themselves or with another image. We end up with a big list of (img_x, img_y, same=Yes/No). Before we push the images through the network, we randomly corrupt each image so they look different. This means assigning a random rotation or changing colors or drawing blocks on top. Then we have our network learn a function which takes two images and spits out same=Yes/No. Voila: contrastive learning. The trick, though, is when it’s finally time to use this network, we drop that last layer which takes our embedding and spits out the ‘yes/no’ value, leaving only the raw numbers in the representation. The assumption is this latent representation should be close for two images which are also similar.
Does it work? Sorta’. There’s a lot of room for improvement. I could use an out-of-the-box solution like EfficientNet or ImageNet, but I’m stubborn and want to do my own thing. It works well enough for finding near and exact duplicates.
Things That Make Me Nervous
Towards the end of the last development cycle, more and more of the internals of the app ended up getting passed around the UI as something of a global state. The final commit before shipping even exposed two engine-internal values, max_search_distance and min_image_similarity. Exposing internal methods tends to make for tight coupling of pieces and opens the door to spaghetti-code in the future. I want to be mindful of this with further development, but I still need to strike a balance of pragmatism and good practice. I’ve seen too many cases of people fetishizing OOP and building out software with a practice in mind that neglects the intention of the practice.
Lastly, I’m not worried about the possibility that nobody uses PixelBox. It’s useful to me and I’m sharing it in the hopes it will be useful to others. The thing that worries me is that a _lot_ of people find it useful and I myself can’t muster the enthusiasm to continue to support it.
Things That Make Me Hopeful
The application is in a good state. Search and indexing are fairly robust and the UI is not completely terrible. I’m looking forward to implementing three key features which will make my life easier:
Search by Text in Image
OCR is a tricky problem. In 2020, Du et. al. created Paddle-Paddle OCR — an open-source multi-stage OCR model. It used synthetic data to train the detector, angle detector, and recognition system. I tried this approach in January of 2018 and couldn’t make it work because I’m dumb: https://github.com/JosephCatrambone/ocr_experiment/blob/master/Generated%20Character%20Recognition.ipynb
Age has made me more stubborn, however, and I’m determined to make a useful OCR library for Python and Rust. I’ll dust off that code and give it my all to make it work.
Search by Description
Modern machine learning is beautiful. We can take an arbitrary image and, from it, generate a plaintext description. I want the user to be able to search on the contents of an image using plain English or, barring that, search on automatically generated tags.
Search Inside Zip Files
This one’s big for my use case. I have plenty of asset files downloaded from stores and most of them are compressed and chilling on my disk somewhere. If PixelBox could search inside of these so I don’t end up re-downloading a zip file for the n-th time it would save me a lot of headache.
Wrapping Up
I’m relieved to make this release. There’s still work to be done but things are in a good enough state for me to take some time and relax. I hope people find it useful and I hope this writeup provides some motivation or inspiration to work on your own creative endeavors.
*Pure INFERENCE, though perhaps not ‘Pure Godot’. While everything here could certainly be done manually in-engine, we’re going to be building a few things for training in PyTorch and maybe even a dash of Rust when it’s convenient, but nevertheless the recognition happens with no external libraries and no FFI overhead. This approach also generalizes trivially to any engine.
Twenty-one years ago, Lionhead Studios released Black and White to the world — a ‘god game’ where the player presides over their worshippers, interacts with their avatar, and tries to defeat a rival deity called ‘Nemesis’. It’s a game with immersive visuals, cleverly executed animal AI, and, key to our discussion today, little to no obtrusive user interface.
One of the things that stuck with me most about this game was the gesture control system. To cast spells, a player would trace out one of a set of symbols with their cursor. If recognized, the game would play a satisfying chime and the cast spell would rush into the hand alongside some nice particle effects. It was an elegant system well befitting a low-speed, minimal-UI game — no numbers to peek at on a keyboard and no inventory to pop in front. To my younger self, there was something about waving one’s hands to cast spells that was, fittingly, magical. We’re going to be building a similar gesture recognition system from end-to-end. While the target here is the Godot Engine, this approach is general enough to be used absolutely anywhere.
Defining a problem
Choosing a technique
Template matching
More template matching
Objective paths
Neural networks
Mr. Makematcher: Make me a matcher
Deciding on an architecture
Defining and training
Exporting a model (as Rust and as a matrix)
Making training data – building a tool in Rust with egui
Building a matrix library in Godot and “loading” our model
From ‘mouse gesture’ to ‘action’
Defining the Problem
We have a series of squiggles with the mouse that we want to map to one of many possible gestures. Let’s decide on a few things we need for this system:
First, gestures should be scale and affine invariant. Whether a player draws a symbol really small and compact or filling the full frame, we shouldn’t care. Rotation shouldn’t impact the recognition of a symbol. We might revisit this later if we want to care about flips and mirrors.
A gesture indicates volition. If a player has to retry a gesture a bunch of times to get something to work, it’s frustrating. Whatever system we have should be robust to this. Ideally, we should also strive to have the lowest possible latency between the player action and real feedback.
Adding gestures shouldn’t be a pain in the ass, but if forced to choose between an easy system that needs to get retrained every time and a hard system that’s general, we should start with the easy one.
If it doesn’t add extra complexity, it would be useful to know how “close” a gesture is to every possible gesture archetype so that we can do neat things like ‘mixing’ gestures together.
Choosing a Technique
Immediately, there are four possibilities that spring to mind:
Template Matching
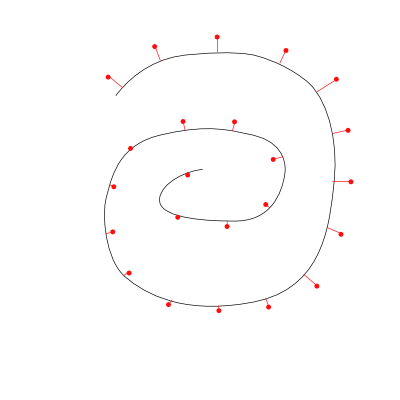
We can try matching templates, where we take a stroke and project each of the points to the nearest line segments. This technique is simple, sample the player’s stroke at a few key points and measure the distance to a template line. Sum the point-to-line projection distances and pick the template with the lowest (normalized) error.
The black line represents the player’s illustrated stroke. The red dots are our ‘idealized’ template. The red lines are the shortest-length error projections.
Advantages to this system: it can be really fast to recognize a gesture, depending on the number of segments in your templates. One needs either to perform a distance calculation for every step in the player’s stroke to every point in the target template or to make a data-structure to simplify this calculation (like a quadtree).
Disadvantages to this system: rotation doesn’t come for free. Directional information is not available, so a left-to-right stroke cannot be differentiated from a right-to-left-stroke. If not properly optimized, the O(n^2) match can easily cause jitters and performance problems. Defining new gestures can be a pain in the butt.
Template Matching, but Different
Rather than project a bunch of points along the player’s stroke to some pre-defined dots, we make a greyscale ‘heatmap’ of our target gestures. When performing our checks, we rasterize our player’s stroke to an image and check how much of it falls inside a template or outside of a template. If I’m being honest, this is the approach that we _should_ be using for this project, but I’m skipping over it because I want to do something else.
A gesture, a ‘heatmap’, the overlay, and the math.
Advantages: This is among the simplest systems to build. It’s quick, elegant, and fairly robust. It also requires no specialized tooling to make the templates: We can generate them by making a square image with a black background and repeatedly drawing over it with a low-opacity white brush to build up the most frequently trodden areas.
Disadvantages: Like most others, we have no sense of left-to-right versus right-to-left. Picking the right granularity of heatmap is really important. One needs to be careful to normalize the maps between different gestures to avoid confusion. Imagine a pure white block: this would always be counted as the best match because every region the player’s gesture/sketch could intersect is part of the valid symbols.
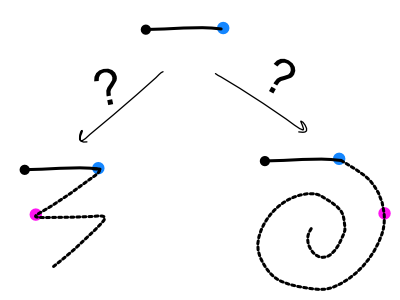
Series of Waypoints
Instead of matching the player’s gesture to a template, we can define certain success and failure criteria for a gesture to be matched. For example, a “spiral” gesture is defined as, “A player must move their cursor to within 100 pixels of the next target waypoint AND it must NOT be within 100 pixels of this other waypoint.” This even allows us to build a nice tree of detections:
At every step we check to see what the closest ‘target’ point is. When the player is within a certain distance of the target, our new goal is specified.
Advantages: include being able to separate a left-to-right gesture from a right-to-left gesture and having a relatively compact memory/CPU footprint. At any given point we’re only checking to see if the player is at least some distance away from the last waypoint and at least some distance towards one of the next waypoints.
Disadvantages: much like the previous approach, one needs to define data in a special format rather than just drawing
The Overcomplicated Neural Network Approach
Lastly, we can define neural network — something like the ones used to recognize handwritten digits for the MNIST challenge. This also has a dozen different choices that we can make internally, like, “Do we want the network to be convolutional or dense?” “Do we want to create an embedding space or do we want to just go straight into classification?” “Do we want to export our model as ONNX or try something else?”
Advantages: Labyrinths Neural networks are awesome! Depending on our architecture of choice, we get the ability to automatically add new gestures at runtime. Among the most robust of detectors, depending on how you do it. No special tools required to make training data, though it can be helpful if you have them.
Disadvantages: Training is error prone. Lots of flexibility means lots of decisions and choices off the bat. The detection process can be slow at runtime, depending on your architecture.
We’re going to go with the neural network approach because it’s neat and gives us the chance to do more fun things later.
Deciding on an Architecture
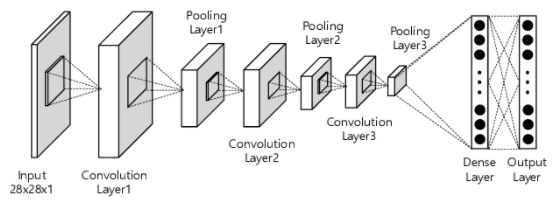
While data science best practices ask that we build an experimental design document first, we are instead going to throw caution to the wind and just decide on an architecture. MNIST digit recognition would have us use convolutional networks because they’re memory efficient, quite fast, and exceptionally performant, but they require that we implement convolutions:
Image Credit: Extension of Convolutional Neural Network with General Image Processing Kernels, J. Jung, Yousun Shin, Youngmin Kwon
On the other hand, a network of dense layers is much simpler to implement, theoretically more performant (because of the greater number of weights for a given input size), and has lots of ready-made solutions available. Fully connected networks ahoy!
This brings us to our next important decision: should we train a classifier or an embedding model?
A classifier takes an image and spits out a probability distribution. If we have three gestures, ‘star’, ‘spiral’, and ‘wave’, then an output might be: ‘star’: 10%, ‘spiral’: 75%, ‘wave’: 15%. We don’t have to do much or any post-processing after we perform an inference, but adding a new gesture means we need to retrain our entire model.
An embedding model (or ‘encoder’) takes a grayscale image of size n by n and creates an ’embedding’ of size k, where ideally k is much smaller than n. We might have a 32×32 image (1024 values, or ‘1024-dimensional’) that gets embedded in a 10-dimensional latent space. Ideally, images that are visually similar should end up in similar places in the latent space. Imagine a map of a grocery store from the top. You might have a canned goods section, a frozen foods section, produce, a bread aisle, and so on, but the map is two-dimensional. Now imagine you take a really high resolution photo of a can of soup. If you knew where the canned goods aisle was, you could represent that huge 8192×8192 image with only two digits, the x coordinate and the y coordinate, rather than 67108864 (8192*8192) values. Of course, this is a lossy process, but the thing we care about is that similar images get grouped together. Getting a good universal gesture embedding requires lots of training data, so this approach is probably a bad idea, but I’m going to do it anyway because if it works we can basically add arbitrary gestures without retraining the model at all.
For our purposes, the only difference between a classifier and an encoder is the training, so we can punt on that detail for now and get right into defining our model:
torch.nn.Sequential(
	torch.nn.Flatten(),
	torch.nn.Linear(in_features=width*height, out_features=256),
	torch.nn.LeakyReLU(inplace=True),
	torch.nn.Linear(256, 128),
	torch.nn.LeakyReLU(inplace=True),
	torch.nn.Linear(128, 32),
	torch.nn.LeakyReLU(inplace=True),
	torch.nn.Linear(32, embedding_size),
	# No activation on last layer
)
That’s it! That defines our whole model — four layers and some activations. We’re using PyTorch and Python to train it, but the final implementation and runtime will be in pure GDScript and can easily be implemented in JavaScript or Rust or whatever language. For the training process, we take a bunch of images and run them all through this encoder to get the latent representation, then we compare the latent representations. For each pair of images in the pass, we check to see if they’re in the same class. If they are, we penalize the encoder for making their embeddings dissimilar and reward it for making the embeddings more similar. After repeating this process a few thousand times, we get some pretty okay embeddings! The full code to train is as follows:
def train(training_data_directory):
	model = build_model(32, 32, 10).to(DEVICE)

	# Set up some rescaling and random flips to give us data augmentation, but don't add noise.
	transforms = tvtf.Compose([
		tvtf.Grayscale(),
		tvtf.RandomHorizontalFlip(),
		tvtf.RandomVerticalFlip(),
		tvtf.RandomRotation(20),
		tvtf.ToTensor(),  # Converts 0,255 PIL -> 0.0,1.0 Tensor.
	])

	# Brace for run...
	loss_fn = torch.nn.CosineEmbeddingLoss()
	optimizer = torch.optim.Adam(model.parameters(), lr=LEARNING_RATE)
	dataset = torchvision.datasets.ImageFolder(training_data_directory, transform=transforms)
	dataset_loader = torch.utils.data.DataLoader(dataset, batch_size=BATCH_SIZE, shuffle=True, num_workers=NUM_WORKERS, pin_memory=True)

	# Training loop:
	for epoch_idx in range(EPOCHS):
		dataloop = tqdm(dataset_loader)
		total_epoch_loss = 0.0
		for batch_idx, (data, targets) in enumerate(dataloop):
			data = data.to(device=DEVICE)
			optimizer.zero_grad()

			# Forward
			embeddings = model(data)

			# One embedding gives us n*(n-1) pairs of datapoints.
			# We rely on the batch being shuffled and having some of each class, but if the entire batch is unlucky
			# and we have all one class, it will be okay.
			# left takes [1, 2, 3, 4] and goes to [1, 1, 1, 1, 2, 2, 2, 2, 3, 3, 3, 3, 4, 4, 4, 4]
			# right takes [1, 2, 3, 4] and goes to [1, 2, 3, 4, 1, 2, 3, 4, 1, 2, 3, 4, 1, 2, 3, 4]
			left = torch.repeat_interleave(embeddings, embeddings.shape[0], axis=0)
			right = embeddings.repeat(embeddings.shape[0], 1)
			truth = list()
			for label_left in targets:
				for label_right in targets:
					truth.append(1.0 if label_left == label_right else -1.0)
			truth = torch.tensor(truth).to(DEVICE)

			# Embedding pairs are 1 if they're the same and -1 if they're not.
			# We match up embeddings based on their classes.
			loss = loss_fn(left, right, truth)

			# Backward
			loss.backward()
			optimizer.step()

			# Log status.
			total_epoch_loss += loss.item()

		print(f"Total epoch loss: {total_epoch_loss}")
		torch.save(model.state_dict(), f"checkpoints/checkpoint_{epoch_idx}")
	torch.save(model, "result_model.pt")
Using PyTorch means we can utilize a GPU to accelerate training, so our runs will be measured in seconds or minutes instead of hours or days. Our final step them is to take the trained model and make it a little easier to use in Godot. A dense layer (or linear layer, as it’s called in PyTorch) is nothing more than a matrix multiply and a bias add. y = mx + b (Hence, linear.) So all we need to do is write the weight matrices and biases to a JSON file and we’re done:
def save_model_to_json(model):
	result_model = dict()
	result_model['description'] = model.__str__()
	result_model['weights'] = list()
	result_model['biases'] = list()
	result_model['shapes'] = list()
	for layer_idx in range(len(model)):
		for param_idx, param in enumerate(model[layer_idx].parameters()):
			weight_or_bias = param.to('cpu').detach().numpy().T
			if len(weight_or_bias.shape) == 1:
				result_model['biases'].append([float(x) for x in weight_or_bias.flatten()])
			else:
				result_model['weights'].append([float(x) for x in weight_or_bias.flatten()])
				result_model['shapes'].append(weight_or_bias.shape)

	with open("result_model.json", 'wt') as fout:
		json.dump(result_model, fout)
Easy peasy. If we had gone with a more complicated architecture we might consider instead using a different format for model export. I’m personally a fan of ONNX because it’s easy to use and fairly widely supported. The downside is we need to build an external library. We might do this in a future post.
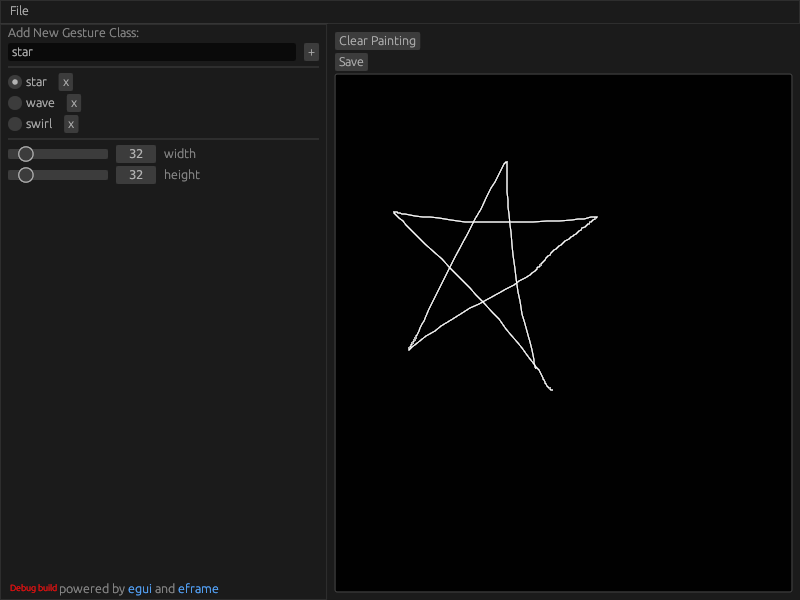
Making Training Data
As a digression, we need lots of training gestures to get a robust embedding. We can draw these in a 32×32 image in MSPaint and save all the files, but that process is slow and boring. I wrote a tool in Rust that lets a person rapidly save a bunch of perfectly cropped, perfectly formatted sample data. The full source is here: https://github.com/JosephCatrambone/MakeGestureDataset
Needed a tool to make a dataset for recognizing gestures/drawings. Hammered a simple one out in #Rust and egui. Took about 20 minutes. pic.twitter.com/yRyihoRXZl
Implementing Dense Networks in Godot with GDScript
The moment we’ve been waiting for. Like we mentioned above, dense layers are just matrix multiplications and additions. Godot lacks a general matrix class, but fortunately it’s trivial to write one. The only methods we need are matmul and add. Subtract and sum are nice to have, but not required. Let’s assume we have a matrix multiply class (which I’m splitting off to a separate repository for space reasons) and we want to load our model from the JSON file. That, it turns out, is trivial:
class_name SequentialModel
extends Resource

var weights:Array[NDArray] = []
var biases:Array[NDArray] = []

func _init(json_model_data:String):
	var json = JSON.new()
	json.parse(json_model_data)
	var model_data = json.get_data()
	for idx in range(0, len(model_data['weights'])):  # Can't zip, so...
		var shape:Array[int] = model_data['shapes'][idx]
		var w:Array[float] = model_data['weights'][idx]
		var b:Array[float] = model_data['biases'][idx]
		var new_weight = NDArray.new(shape[0], shape[1])
		new_weight.data = w
		var new_bias = NDArray.new(1, shape[1])
		new_bias.data = b
		weights.append(new_weight)
		biases.append(new_bias)

func predict(data:Array[float]):
	var x = NDArray.new(1, len(data))
	x.data = data
	for idx in range(len(self.weights)):
		x = x.matmul(self.weights[idx])
		if idx != len(self.weights)-1:
			x = x.leaky_relu()
	return x
And finally, we can utilize this method by converting a gesture into a 32×32 image, flattening it, and sending it to our predict method to get the embedding. We then check the embedding against our known embeddings and pick the closest one. We’re done!
Embedding MP4s is hard, so pretend this is animated.
There’s still room to improve: for one, there’s a lot of latency when we do the matrix multiply in GDScript. We also don’t know how well this will generalize to dozens of gestures and how robust it is to noise, but all things considered I’m happy with the result.
That’s all. The full source for the training, Godot project, and labeled data tool are all available on GitHub.